使用OSGi进行动态加载更新模块-实现Hello world
OSGI
OSGi是Open Services Gateway initiative的缩写,叫做开放服务网关协议。OSGI是用于定义Java动态化组件系统的标准,这些标准通过为大型分布式系统以及嵌入式系统提供一种模块化架构减少了软件的复杂度,基于OSGI比较成功的项目有Equinox,felix,Knopflerfish,关于OSGI的详情参考http://osgi.com.cn/article/7289226,接下来使用OSGI来演示我们最熟悉的Hello world
开发环境
Eclipse4.2.2 (他是基于Equinox实现的,已经自带osgi framework),jre1.7
OSGI服务的创建
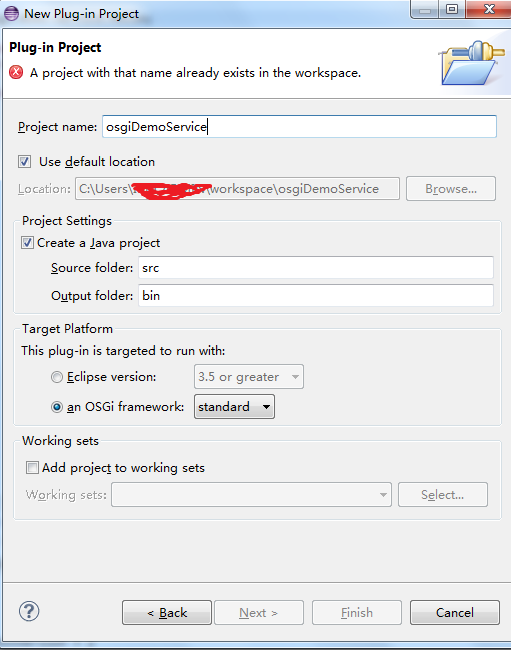
首先新建名称为osgiDemoService的一个OSGI项目:File->New->Project->Plug-in Project

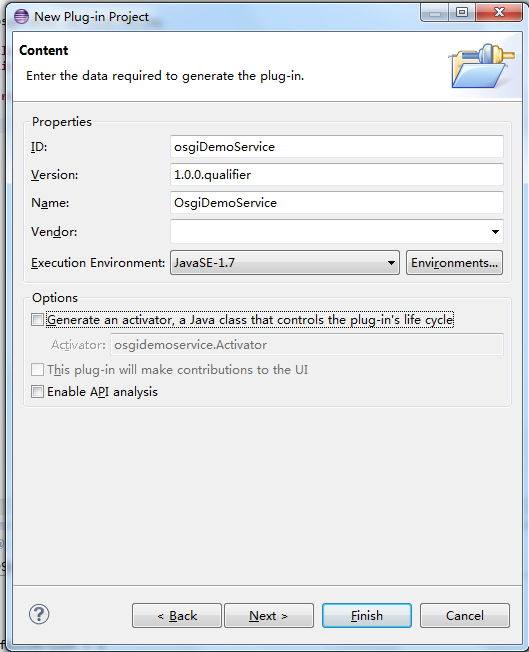
该项目为服务层,不需要生成Actviator
在该项目中新建一个接口osgi.demo.impl.Hello
1 | package osgi.demo.service; |
最后的MANIFEST.MF文件为
Manifest-Version: 1.0
Bundle-ManifestVersion: 2
Bundle-Name: OsgiDemoService
Bundle-SymbolicName: osgiDemoService
Bundle-Version: 1.0.0.qualifier
Bundle-RequiredExecutionEnvironment: JavaSE-1.7
Export-Package: osgi.demo.service;version="1.0.0"
OSGI服务的实现
新建名称为osgiDemoImpl的一个OSGI项目,此时需要勾选生成Actviator
在该项目中添加一个实现类:osgi.demo.impl.HelloImpl,该类需要继承osgi.demo.service.Hello接口,但是默认是没有osgi.demo.servi包的,所以需要添加osgiDemoService的Bundlle的依赖,以及导入Package:osgi.demo.service,这个可以通过MANIFEST.MF文件的Dependencies界面来完成,也可以直接改它的XML源文件。
实现接口的代码为:
1 | package osgi.demo.impl; |
在Actviator中进行服务的注册
1 | package osgidemoimpl; |
该项目最终的MANIFEST.MF文件为:
Manifest-Version: 1.0
Bundle-ManifestVersion: 2
Bundle-Name: OsgiDemoImpl
Bundle-SymbolicName: osgiDemoImpl
Bundle-Version: 1.0.0.qualifier
Bundle-Activator: osgidemoimpl.Activator
Import-Package: org.osgi.framework;version="1.3.0";osgi.demo.service
Bundle-RequiredExecutionEnvironment: JavaSE-1.7
Require-Bundle: osgiDemoService;bundle-version="1.0.0"
OSGI服务的使用
新建名称为osgiDemoClient的一个OSGI项目,此时需要勾选生成Actviator
在使用的项目中需要添加Service的Bundle的依赖,同时导入osgi.demo.service包
在Activator中调用服务的代码为:1
2
3
4
5
6
7
8
9
10
11
12
13
14
15
16
17
18
19
20
21
22
23
24
25
26
27
28
29
30
31
32
33
34
35
36
37
38
39
40
41
42
43
44
45
46
47
48
49
50
51package osgidemoclient;
import org.osgi.framework.BundleActivator;
import org.osgi.framework.BundleContext;
import org.osgi.framework.ServiceReference;
import osgi.demo.service.*;
public class Activator implements BundleActivator {
private static BundleContext context;
static BundleContext getContext() {
return context;
}
/*
* (non-Javadoc)
* @see org.osgi.framework.BundleActivator#start(org.osgi.framework.BundleContext)
*/
public void start(BundleContext ctx) throws Exception {
ServiceReference ref = ctx.getServiceReference(Hello.class.getName());
if (ref != null) {
Hello hello = null;
try {
hello = (Hello) ctx.getService(ref);
if (hello != null)
System.out.println(hello.sayHello("world"));
else
System.out.println("Service:Hello---object null");
} catch (RuntimeException e) {
e.printStackTrace();
} finally {
ctx.ungetService(ref);
hello = null;
}
} else {
System.out.println("Service:Hello---not exists");
}
System.out.println("clinet");
Activator.context = ctx;
}
/*
* (non-Javadoc)
* @see org.osgi.framework.BundleActivator#stop(org.osgi.framework.BundleContext)
*/
public void stop(BundleContext bundleContext) throws Exception {
Activator.context = null;
}
}
该项目最终的MANIFEST.MF文件为:
Manifest-Version: 1.0
Bundle-ManifestVersion: 2
Bundle-Name: OsgiDemoClient
Bundle-SymbolicName: osgiDemoClient
Bundle-Version: 1.0.0.qualifier
Bundle-Activator: osgidemoclient.Activator
Import-Package: org.osgi.framework;version="1.3.0";osgi.demo.service
Bundle-RequiredExecutionEnvironment: JavaSE-1.7
Require-Bundle: osgiDemoService;bundle-version="1.0.0"
在Eclipse中运行
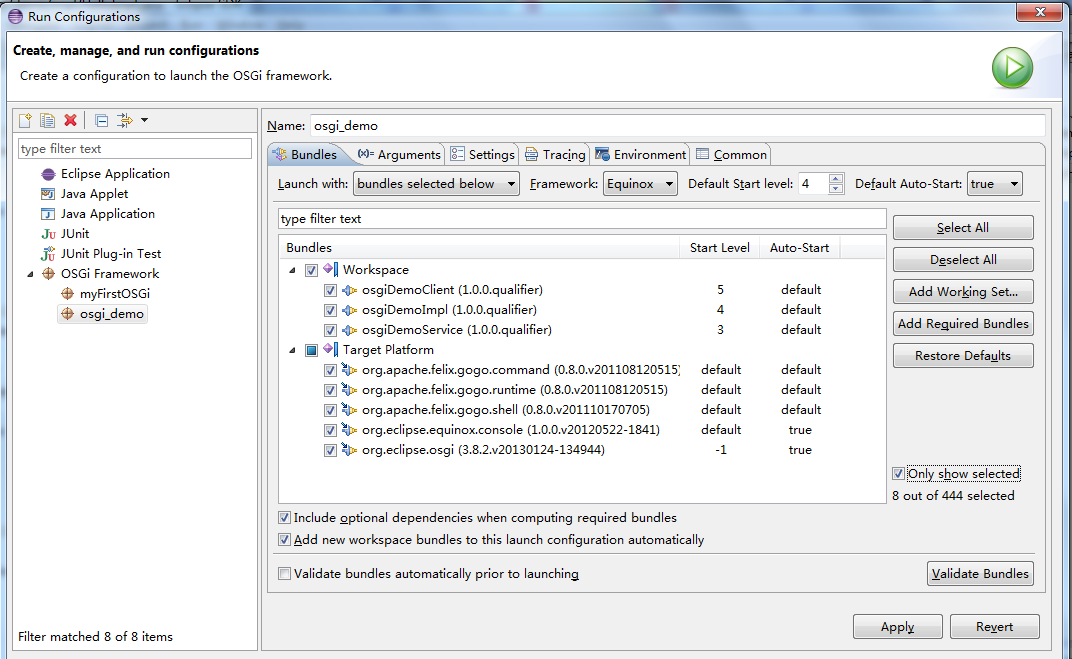
点击:run -> run Configurations->OSGI Framework->new 新建一个
点击该界面的run就开始跑起来的
implement hello interface
hello world
clinet
osgi>
输入ss命令查看状态
osgi> ss
"Framework is launched."

id    State       Bundle
0    ACTIVE      org.eclipse.osgi_3.8.2.v20130124-134944
1    ACTIVE      org.eclipse.equinox.console_1.0.0.v20120522-1841
3    ACTIVE      org.apache.felix.gogo.command_0.8.0.v201108120515
4    ACTIVE      org.apache.felix.gogo.runtime_0.8.0.v201108120515
6    ACTIVE      org.apache.felix.gogo.shell_0.8.0.v201110170705
9    ACTIVE      osgiDemoClient_1.0.0.qualifier
10    ACTIVE      osgiDemoService_1.0.0.qualifier
11    ACTIVE      osgiDemoImpl_1.0.0.qualifier
12    ACTIVE      javax.servlet.jsp_2.2.0.v201112011158
13    ACTIVE      javax.servlet_3.0.0.v201112011016
14    ACTIVE      javax.el_2.2.0.v201108011116
osgi>
这几个服务都已经ACTIVE状态了
小心,felix和console这几个bundle一定要勾选上,还有demo种几个bundle的运行顺序service->impl->client,不然很可能跑不起来
动态加载
将刚刚新建的三个项目导出到本地:Export->Plug-in Development->Deployable pulg-ins and fragments
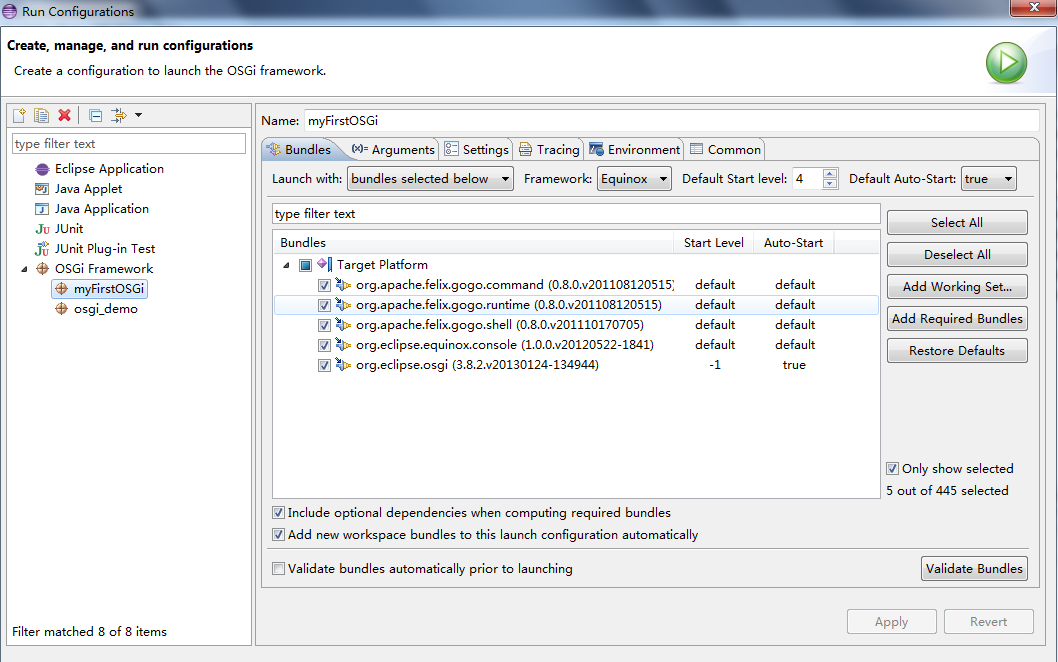
然后在run Configurations->OSGI Framework->new 新建一个只带osgi.framework的configuration
将他run起来,执行ss之后可以发现只有他自带的几个bundle
osgi> ss
"Framework is launched."


id    State       Bundle
0    ACTIVE      org.eclipse.osgi_3.8.2.v20130124-134944
1    ACTIVE      org.eclipse.equinox.console_1.0.0.v20120522-1841
2    ACTIVE      org.apache.felix.gogo.command_0.8.0.v201108120515
3    ACTIVE      org.apache.felix.gogo.runtime_0.8.0.v201108120515
4    ACTIVE      org.apache.felix.gogo.shell_0.8.0.v201110170705
osgi>
现在动态安装刚刚导出的bundle
osgi> install file:///C:/Users/你的用户名/Desktop/plugins/osgiDemoService_1.0.0.201504021042.jar
Bundle id is 10
ClassLoader          null
RegisteredServices   null
ServicesInUse        null
Fragments            null
LoaderProxy          osgiDemoService; bundle-version="1.0.0.201504021042"
Key                  10
ProtectionDomain     null
Location             file:///C:/Users/IBM_ADMIN/Desktop/plugins/osgiDemoService_1.0.0.201504021042.jar
State                2
Bundle                  10|Installed  |    1|osgiDemoService (1.0.0.201504021042)
Version              1.0.0.201504021042
BundleData           osgiDemoService_1.0.0.201504021042
LastModified         1427942820117
Headers               Bundle-ManifestVersion = 2
 Bundle-Name = OsgiDemoService
 Bundle-RequiredExecutionEnvironment = JavaSE-1.7
 Bundle-SymbolicName = osgiDemoService
 Bundle-Version = 1.0.0.201504021042
 Export-Package = osgi.demo.service;version="1.0.0"
 Manifest-Version = 1.0


StartLevel           1
BundleId             10
BundleContext        null
SymbolicName         osgiDemoService
KeyHashCode          10
Framework            org.eclipse.osgi.framework.internal.core.Framework@2b6cc7c7
Revisions            [osgiDemoService_1.0.0.201504021042]
StateChanging        null
BundleDescription    osgiDemoService_1.0.0.201504021042
ResolutionFailureException org.osgi.framework.BundleException: The bundle "osgiDemoService_1.0.0.201504021042 [10]" could not be resolved
将起来两个也安装起来
install file:///C:/Users/你的用户名/Desktop/plugins/osgiDemoImpl_1.0.0.201504021042.jar
install file:///C:/Users/你的用户名/Desktop/plugins/osgiDemoClient_1.0.0.201504021042.jar
注意 安装的时候路径前面要加file:///
然后执行ss查看状态
osgi> ss
"Framework is launched."


id    State       Bundle
0    ACTIVE      org.eclipse.osgi_3.8.2.v20130124-134944
1    ACTIVE      org.eclipse.equinox.console_1.0.0.v20120522-1841
2    ACTIVE      org.apache.felix.gogo.command_0.8.0.v201108120515
3    ACTIVE      org.apache.felix.gogo.runtime_0.8.0.v201108120515
4    ACTIVE      org.apache.felix.gogo.shell_0.8.0.v201110170705
10    INSTALLED   osgiDemoService_1.0.0.201504021042
11    INSTALLED   osgiDemoImpl_1.0.0.201504021042
12    INSTALLED   osgiDemoClient_1.0.0.201504021042
osgi>
可以发现自己新建的3个bundle已经成功安装,但是尚未解析,所以再执行以下resolve命令,在ss:
osgi> resolve
osgi> ss
"Framework is launched."


id    State       Bundle
0    ACTIVE      org.eclipse.osgi_3.8.2.v20130124-134944
1    ACTIVE      org.eclipse.equinox.console_1.0.0.v20120522-1841
2    ACTIVE      org.apache.felix.gogo.command_0.8.0.v201108120515
3    ACTIVE      org.apache.felix.gogo.runtime_0.8.0.v201108120515
4    ACTIVE      org.apache.felix.gogo.shell_0.8.0.v201110170705
10    RESOLVED    osgiDemoService_1.0.0.201504021042
11    RESOLVED    osgiDemoImpl_1.0.0.201504021042
12    RESOLVED    osgiDemoClient_1.0.0.201504021042
osgi>
可以看到他们已经解析(因为在安装的时候是逐个安装的,某些bundle的依赖并没有满足,所以不能解析)
已RESOLVED状态了之后就可以跑起来了
id    State       Bundle
0    ACTIVE      org.eclipse.osgi_3.8.2.v20130124-134944
1    ACTIVE      org.eclipse.equinox.console_1.0.0.v20120522-1841
2    ACTIVE      org.apache.felix.gogo.command_0.8.0.v201108120515
3    ACTIVE      org.apache.felix.gogo.runtime_0.8.0.v201108120515
4    ACTIVE      org.apache.felix.gogo.shell_0.8.0.v201110170705
10    RESOLVED    osgiDemoService_1.0.0.201504021042
11    RESOLVED    osgiDemoImpl_1.0.0.201504021042
12    RESOLVED    osgiDemoClient_1.0.0.201504021042
osgi> start 9
gogo: IllegalArgumentException: Cannot coerce start(String) to any of [(Bundle[])]
osgi> start 12
Service:Hello---not exists
clinet
osgi>
发现没有找到服务,再看一下状态
osgi> ss
"Framework is launched."


id    State       Bundle
0    ACTIVE      org.eclipse.osgi_3.8.2.v20130124-134944
1    ACTIVE      org.eclipse.equinox.console_1.0.0.v20120522-1841
2    ACTIVE      org.apache.felix.gogo.command_0.8.0.v201108120515
3    ACTIVE      org.apache.felix.gogo.runtime_0.8.0.v201108120515
4    ACTIVE      org.apache.felix.gogo.shell_0.8.0.v201110170705
10    RESOLVED    osgiDemoService_1.0.0.201504021042
11    RESOLVED    osgiDemoImpl_1.0.0.201504021042
12    ACTIVE      osgiDemoClient_1.0.0.201504021042
osgi>
服务和实现的bundle还没有开起来,所以将这两个逐个启动之后:
osgi> start 10
osgi> start 11
implement hello interface
osgi> refresh 12
osgi> hello world
clinet
最后运行的结果就是我们所需要的
动态更新
OSGI除了可以动态加载服务以外还可以动态进行更新
现将osgi.demo.impl.HelloImpl进行相应的修改1
2
3
4
5
6
7
8
9
10package osgi.demo.impl;
import osgi.demo.service.Hello;
public class HelloImpl implements Hello {
public String sayHello(String str)
{
return "updated:hello "+str;
}
}
将该bundle进行导出,然后将osgiDemoImpl的bundle进行update,再刷新osgiDemoClient即可看到:
osgi> update 11
implement hello interface
osgi> refresh 12
osgi> updated:hello world
clinet
发现输出的已经是刷新后的效果了
小提醒:在导出之后会发现jar后面会跟上导出的时候,所以在更新时需要将原来的jar包删除,将新导出的jar包重命名为原来的jar的文件名
参考
本作品采用[知识共享署名-非商业性使用-相同方式共享 2.5]中国大陆许可协议进行许可,我的博客欢迎复制共享,但在同时,希望保留我的署名权kubiCode,并且,不得用于商业用途。如您有任何疑问或者授权方面的协商,请给我留言。

