(译)OSGi-Services,OSGI-服务
本教程介绍了关于服务声明相关的OSGI服务用法,Eclipse Equinox作为OSGI的服务器使用,本教程使用了Eclipse4.3(Kepler)。
1. 准备
下面的教程假定你已经熟悉OSGI的运行时以及模块层(原文,译文)相关的描述。
2. OSGI服务
2.1. 什么是OSGI服务
一个OSGI的服务被定义为一个标准的Java类或者接口,通常一个Java接口被作为服务的接口来使用。一个bundle可以注册或者使用服务,为了达到此功能,OSGI提供了中心的服务注册表。
一个服务可以被动态的启动和停止,bundle在使用服务时必需有这种操控动态行为的能力,bundle服务可以注册一个监听器来监听服务的启动和停止。
2.2. 定义服务的最佳实践
定义一个服务最通常的方法就是通过一个含有接口的bundle来定义,其他的bundle将会提供这个服务的实现,这就可以允许你通过不同的bundle来改变服务的实现。
2.3. 服务的属性
在BundleContext类里面的registerService()方法你可以通过字典参数来指定任意的属性,你可以通过ServiceReference类中的getProperty()方法去访问一个指定的属性,该类属于org.osgi.framework包。
2.4. OSGI服务的选择
如果一些服务都是可用的并且对相同的API都是有效的,那么OSGI运行时将会默认得选择最低的SERVICE_ID作为使用的服务,你也可以通过服务的属性来设置你的SERVICE_RANKING,OSGI默认将会分配一个0的SERVICE_RANKING并且会选择较高RANKING值的服务来运行。(译者:这里我实验了一下,SERVICE_ID不可指定,SERVICE_RANKING可指定,但是默认为null,也就是说你想手动指定运行相同API的服务的话去指定SERVICE_RANKING就好了)org.osgi.framework包中的Constants类包含了SERVICE_RANKING值的字符串名称常量,这个常量可以用于设置RANKING的值。
3. OSGI声明式服务
3.1. 定义声明式服务
OSGI的声明式服务功能(declarative services 简称:DS)可以让你通过元数据信息(XML)来定义和使用服务。通过DS你可以不使用任何扩展或者实现的类就可以定义服务了,这将允许这些服务在OSGI的运行时被独立的测试。
OSGI服务组件负责启动服务,通过声明服务或者其他方式来创建服务,这对服务消费者来说是不可见的。(这段不知道咋翻译了-_-,有兴趣去看原文)
服务组件包含一个XML描述和一个对象实例,服务描述包含服务组件的全部信息,例如组件实例类的名称,服务的接口等。
服务组件的引用在MANIFEST.MF中通过Service-Component属性来定义,如果OSGI在运行时找到了这样的引用,那么org.eclipse.equinox.ds插件将会创建相应的服务。
下面样例演示了如何在MANIFEST.MF中定义一个组件的引用:
Manifest-Version: 1.0
Bundle-ManifestVersion: 2
Bundle-Name: Service
Bundle-SymbolicName: com.example.e4.rcp.todo.service
Bundle-Version: 1.0.0.qualifier
Bundle-Vendor: EXAMPLE
Bundle-RequiredExecutionEnvironment: JavaSE-1.6
Bundle-ActivationPolicy: lazy
Service-Component: OSGi-INF/service.xml
3.2. 必需的bundles
为了使用声明服务你需要下面的几个框架bundles
- org.eclipse.equinox.util
- org.eclipse.equinox.ds
- org.eclipse.osgi.services
3.3. 一个DS服务的定义
通常组件定义通过New → Other… → Plug-in Development → Component Definition在插件项目的OSGI-INF文件中创建,这个定义向导也会将Service-Component属性登记到MANIFEST.MF文件。
在向导的第一个界面,你可以输入组件定义文件的文件名称,组件名称和实现接口的类。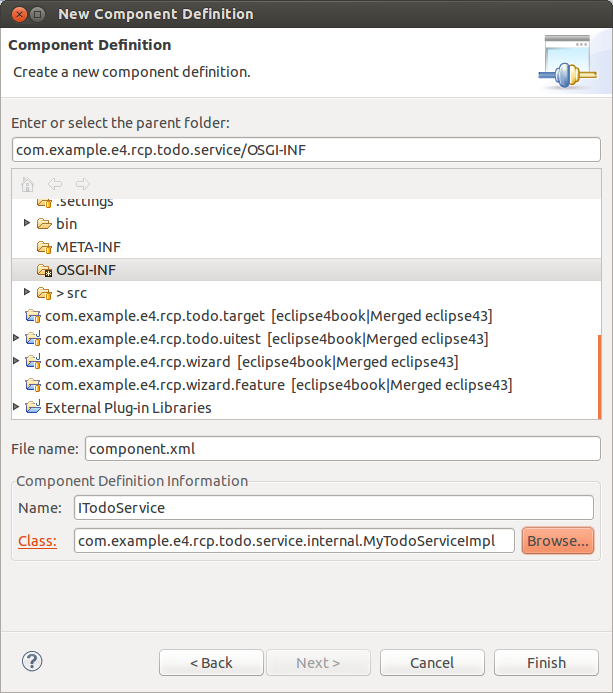
如果你按下完成按钮,服务的编辑界面将会被打开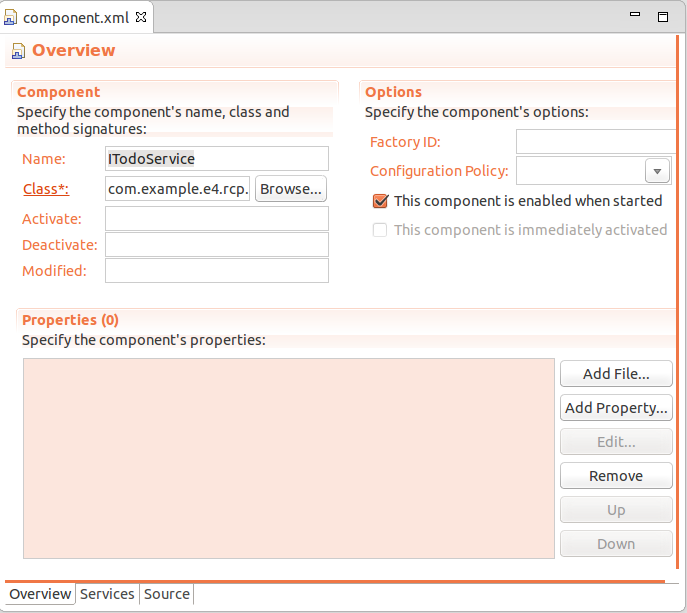
在服务的选项卡界面你可以输入服务的提供者或者引用的服务。例如提供一个服务的时候你需要按下Provided Services下面的增加按钮以及选择你希望被实现的接口。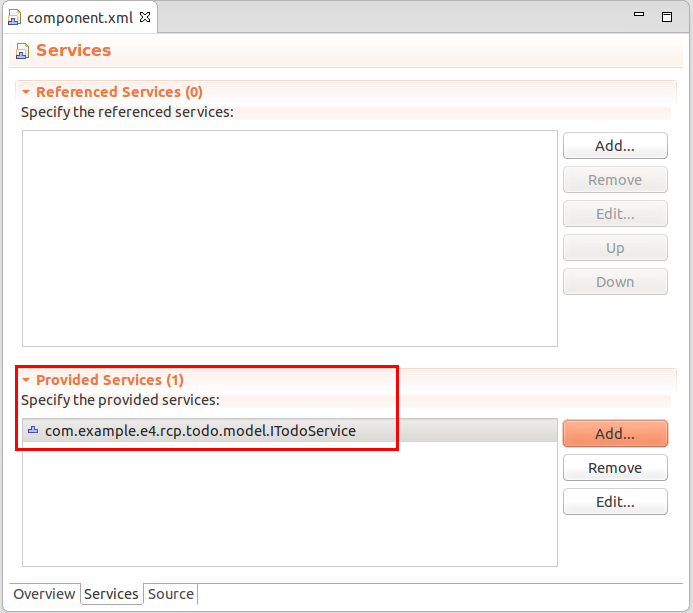
最后一步你需要实现提供服务的类(译者:这。。。。-_-,不说了,建议去看原文吧)。
一个正确的component.xml XML文件将会如下所示:1
2
3
4
5
6
7<?xml version="1.0" encoding="UTF-8"?>
<scr:component xmlns:scr="http://www.osgi.org/xmlns/scr/v1.1.0" name="ITodoService">
<implementation class="com.example.e4.rcp.todo.service.internal.MyTodoServiceImpl"/>
<service>
<provide interface="com.example.e4.rcp.todo.model.ITodoService"/>
</service>
</scr:component>
译者:上面的原图应该是有问题的吧????下面贴上我的图:1
2
3
4
5
6
7<?xml version="1.0" encoding="UTF-8"?>
<scr:component xmlns:scr="http://www.osgi.org/xmlns/scr/v1.1.0" name="de.vogella.osgi.ds.quoteservice">
<implementation class="de.vogella.osgi.ds.quoteservice.QuoteService"/>
<service>
<provide interface="de.vogella.osgi.quote.IQuoteService"/>
</service>
</scr:component>
这意味着有一个名字叫ITodoService的组件,它提供了ITodoService接口对应的服务,这个组件被MyTodoServiceImpl这个类所实现。
在组件的定义之后你的MANIFEST.MF文件包含一个服务组件的入口
Manifest-Version: 1.0
Bundle-ManifestVersion: 2
Bundle-Name: Service
Bundle-SymbolicName: com.example.e4.rcp.todo.service
Bundle-Version: 1.0.0.qualifier
Bundle-Vendor: EXAMPLE
Bundle-RequiredExecutionEnvironment: JavaSE-1.6
Require-Bundle: com.example.e4.rcp.todo.model;bundle-version="1.0.0",
 com.example.e4.rcp.todo.events;bundle-version="1.0.0",
 org.eclipse.e4.core.services;bundle-version="1.0.0",
 org.eclipse.e4.core.contexts;bundle-version="1.1.0",
 javax.inject;bundle-version="1.0.0",
 org.eclipse.e4.core.di,
 org.eclipse.e4.ui.model.workbench
Bundle-ActivationPolicy: lazy
Service-Component: OSGI-INF/component.xml
3.4 自动启动的定义
org.eclipse.core.runtime定义为OSGI的运行时。org.eclipse.equinox.ds这个bundle将会读取组件的元数据,以及基于组件定义文件进行服务的注册。
因此这两个bundle需要在你的服务可用之前进行启动。
你可以通过在运行配置中设置auto-start为true以及设置他们的启动级别小于default(默认为4)来保证这两个bundle先启动。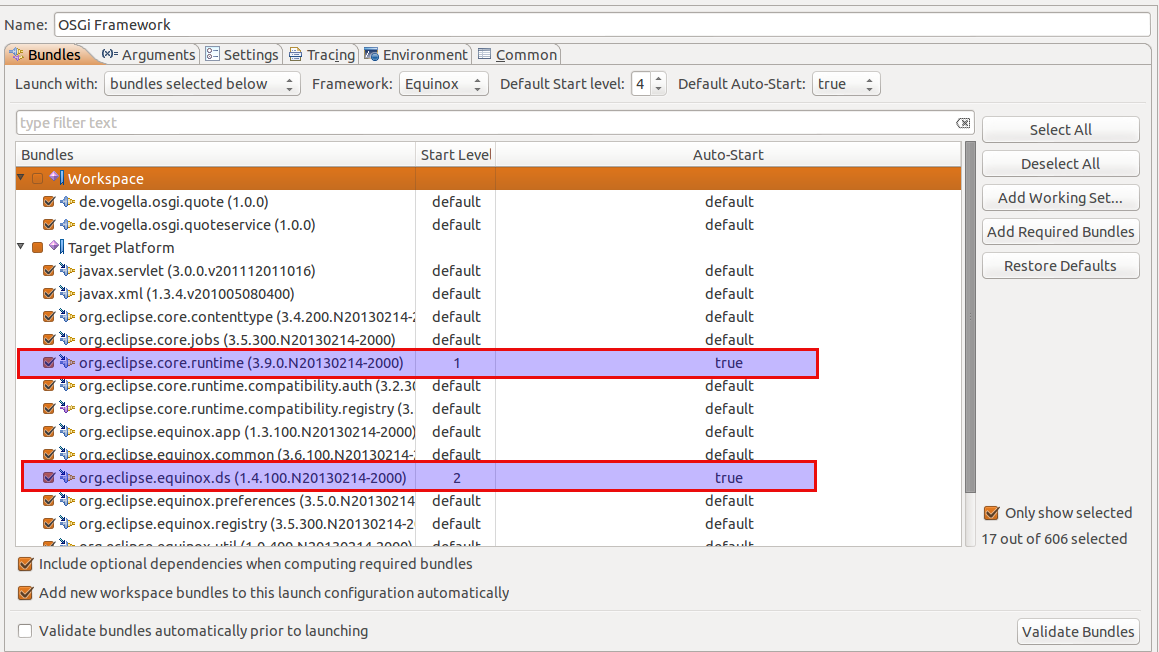
这个需要服务MANIFEST.MF文件中Activate this plug-in when one of its classes is loaded被勾上,通过这个标志可以确保你的服务在org.eclipse.equinox.ds启动之后可用。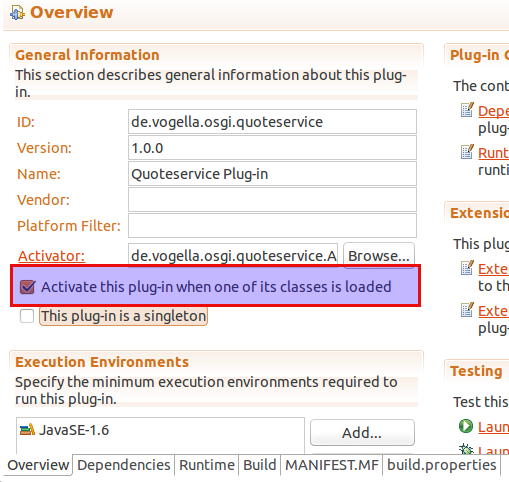
警告:如果你在启动服务时遇到问题,请确保
core、ds这两个插件是自动启动的,以及有一个比你服务使用者更低的启动级别,还要确保Activate this plug-in when one of its classes is loaded被勾上。
3.5. 低等级的OSGI服务API
OSGI也可以提供一个低等级的API,参见6.1节
4. 教程:定义一个OSGI服务的声明
下面将会定义一个基于quote样例的DS服务,因此你需要创建一个含有接口定义的的项目“de.vogella.osgi.quote”。
创建一个插件项目“de.vogella.osgi.quote”,该项目不使用任何模板,并且不创建Activator,在MANIFST.MF文件中导入依赖。
在你的项目中创建OSGI-INF文件夹,向上文一样创建一个新的组件定义,实现服务接口IQuoteService的类为de.vogella.osgi.ds.quoteservice.QuoteService。1
2
3
4
5
6
7
8
9
10
11
12
13
14
15
16
17
18
19
20
21
22
23
24package de.vogella.osgi.ds.quoteservice;
import java.util.Random;
import de.vogella.osgi.quote.IQuoteService;
public class QuoteService implements IQuoteService {
@Override
public String getQuote() {
Random random = new Random();
// create a number between 0 and 2
int nextInt = random.nextInt(3);
switch (nextInt) {
case 0:
return "Ds: Tell them I said something";
case 1:
return "Ds: I feel better already";
default:
return "Ds: Hubba Bubba, Baby!";
}
}
}
打开component.xml以及选择“Source”的选项卡,最终的显示如下所示:1
2
3
4
5
6
7<?xml version="1.0" encoding="UTF-8"?>
<scr:component xmlns:scr="http://www.osgi.org/xmlns/scr/v1.1.0" name="ITodoService">
<implementation class="com.example.e4.rcp.todo.service.internal.MyTodoServiceImpl"/>
<service>
<provide interface="com.example.e4.rcp.todo.model.ITodoService"/>
</service>
</scr:component>
将你的Eclipse/plugin目录下的”org.eclipse.equinox.ds.jar”, “org.eclipse.osgi.services.jar” 和 “org.eclipse.equinox.util.jar” 文件包括到一个文件夹中,如“C:\temp\bundles\plugins”,以及将这些bundles通过OSGI运行时进行安装。
install file:c:\temp\bundles\plugins\org.eclipse.equinox.ds.jar
install file:c:\temp\bundles\plugins\org.eclipse.equinox.util.jar
install file:c:\temp\bundles\plugins\org.eclipse.osgi.services.jar
手动的启动这些bundles以保证声明引用是可用的。
导出你自己的bundle以及将它安装:
install file:c:\temp\bundles\plugins\de.vogella.osgi.ds.quoteservice.jar
你可以使用”services”命令来检查你的服务是否已经注册。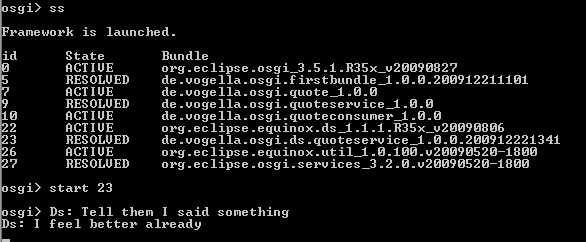
译者:这里是不是有跳过几步了?那个getQuote()方法还完全还没有调用啊!!!-_-
5. 教程:通过服务声明来使用服务
当然你也可以通过DS来定义服务的消费者。
创建一个名称为“de.vogella.osgi.ds.quoteconsumer”的插件,不使用模板,不要创建Activator,在MANIFEST.MF文件中导入引用包“de.vogella.osgi.quote”。
创建如下的类:1
2
3
4
5
6
7
8
9
10
11
12
13
14
15
16
17
18
19
20
21
22
23
24
25
26
27package de.vogella.osgi.ds.quoteconsumer;
import de.vogella.osgi.quote.IQuoteService;
public class QuoteConsumer {
private IQuoteService service;
public void quote() {
System.out.println(service.getQuote());
}
// Method will be used by DS to set the quote service
public synchronized void setQuote(IQuoteService service) {
System.out.println("Service was set. Thank you DS!");
this.service = service;
// I know I should not use the service here but just for demonstration
System.out.println(service.getQuote());
}
// Method will be used by DS to unset the quote service
public synchronized void unsetQuote(IQuoteService service) {
System.out.println("Service was unset. Why did you do this to me?");
if (this.service == service) {
this.service = null;
}
}
}
注意:这个类不依赖于OSGI
创建一个OSGI-INF文件夹以及在这个文件夹中创建新的组件定义: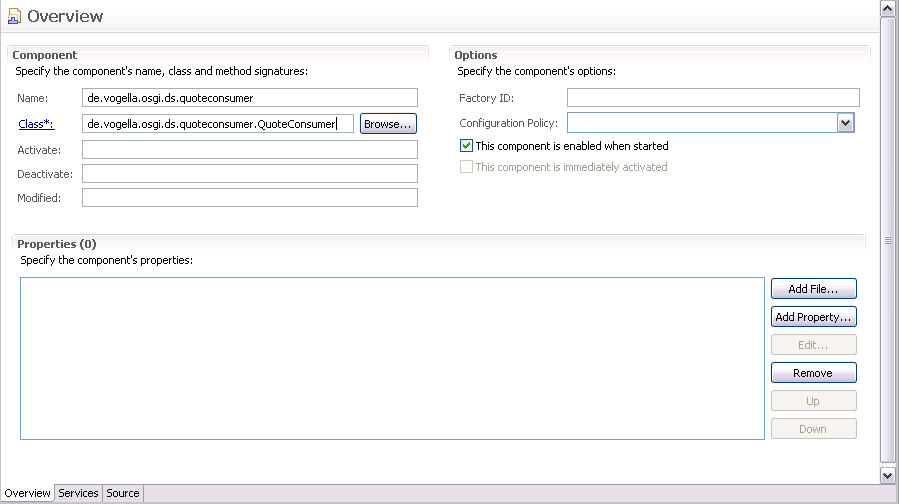
这次将会是使用一个服务,操作“Referenced Services”:
选择该实体点击编辑按钮可以通过bind()和unbind()方法来修改对应的绑定。
操作完之后的component.xml看起来应该是这个样纸的:1
2
3
4
5<?xml version="1.0" encoding="UTF-8"?>
<scr:component xmlns:scr="http://www.osgi.org/xmlns/scr/v1.1.0" name="de.vogella.osgi.ds.quoteconsumer">
<implementation class="de.vogella.osgi.ds.quoteconsumer.QuoteConsumer"/>
<reference bind="setQuote" cardinality="1..1" interface="de.vogella.osgi.quote.IQuoteService" name="IQuoteService" policy="static" unbind="unsetQuote"/>
</scr:component>
对应的MANIFEST.MF应该是这样的:
Manifest-Version: 1.0
Bundle-ManifestVersion: 2
Bundle-Name: Quoteconsumer
Bundle-SymbolicName: de.vogella.osgi.ds.quoteconsumer
Bundle-Version: 1.0.4
Bundle-RequiredExecutionEnvironment: JavaSE-1.6
Import-Package: de.vogella.osgi.quote
Service-Component: OSGI-INF/component.xml
导出你的插件以及安装它:
install file:c:\temp\bundles\plugins \de.vogella.osgi.ds.quoteconsumer.jar
如果你使用start id_of_your_bundle马上进行启动你应该会得到服务已经设置的反馈以及一个quote将会返回给你。
6. OSGI服务低等级的API
6.1. 使用服务API
在OSGI的定义和使用上你应该会喜欢像OSGI服务声明一样更高级别的的服务,因为他们可以简化OSGI服务使用的操作。本章节描述如何让OSGI服务直接工作。
6.2. BundleContext
通过BundleContext类可以访问服务的注册中心。
一个bundle可以定义一个Bundle-Activator(Activator)类,这个必须继承Bundle-Activator接口。如果定义了该类,OSGI将会将BundleContext注入到start()和stop()这两个实现接口的方法中。1
2
3
4
5
6
7
8
9
10
11
12
13
14
15
16
17
18
19
20import org.osgi.framework.BundleActivator;
import org.osgi.framework.BundleContext;
public class Activator implements BundleActivator {
public void start(BundleContext context) throws Exception {
System.out.println("Starting bundle");
// do something with the context, e.g.
// register services
}
public void stop(BundleContext context) throws Exception {
System.out.println("Stopping bundle");
serviceTracker.close();
// do something with the context, e.g.
// unregister service
}
}
如果你没有一个Activator,你可以使用OSGI框架中的FrameworkUtil类来检索得到BundleContext这个类。
6.3. 注册服务API
一个bundle也可以注册它自己为BundleContext的事件ServiceEvents。例如去触发一个新的bundle的安装、卸载或者一个服务的注册。(译者:没看懂这段想干嘛?)
在一个bundle中发布一个服务你可以这么做:1
2
3
4
5
6
7
8
9
10public class Activator implements BundleActivator {
// ...
public void start(BundleContext context) throws Exception {
context.
registerService(IMyService.class.getName(),
new ServiceImpl(), null);
}
// ...
}
一旦一个服务不再使用你必须使用OSGI将这个服务注销,OSGI允许你动态替换服务。1
context.ungetService(serviceReference);
6.4. 访问一个服务
一个bundle可以通过BundleContext类来获取一个服务,可以用如下来演示:
1 | ServiceReference<?> serviceReference = context. |
6.5. 低等级的API vs OSGI服务的声明
OSGI的服务可以动态的启动和停止。如果你使用OSGI低等级的API就不得不去动态的修改代码,这将会导致你的源代码非常的复杂,如果你不能正确的掌控你的服务消费者对服务保持一个引用,这个服务将不能通过OSGI框架进行移除。
为了掌控动态的自动化,服务的声明被开发出来了,因为相比较而言服务的声明要比低等级的API更加喜欢。
7. 教程:使用OSGI服务API
在下面我们将定义和消费一个服务,我们的服务将会返回”famous quotes”。
7.1 定义服务的接口
创建一个插件项目叫做”de.vogella.osgi.quote”,同时创建一个名字叫”de.vogella.osgi.quote”的包,不要使用模板,也不需要创建Activator。之后选择MANIFEST.MF和它的Runtime选项卡,添加”de.vogella.osgi.quote”到导出包。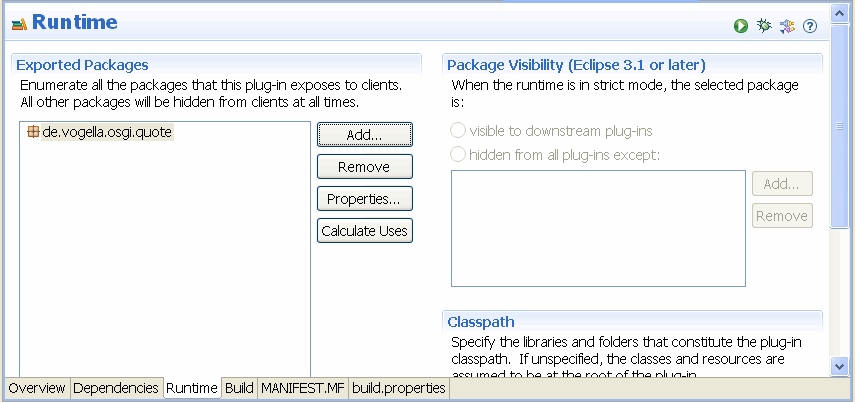
根据如下的代码创建接口IQuoteService:1
2
3
4
5package de.vogella.osgi.quote;
public interface IQuoteService {
String getQuote();
}
7.2. 创建服务
我们将创建一个提供实现的接口的bundle(译者:删除线为翻译时添加)。
创建一个名称叫”de.vogella.osgi.quoteservice”的插件项目,不要使用模板。
选择MANIFEST.MF文件和它的dependecy选项卡,添加”de.vogella.osgi.quote”到插件引用。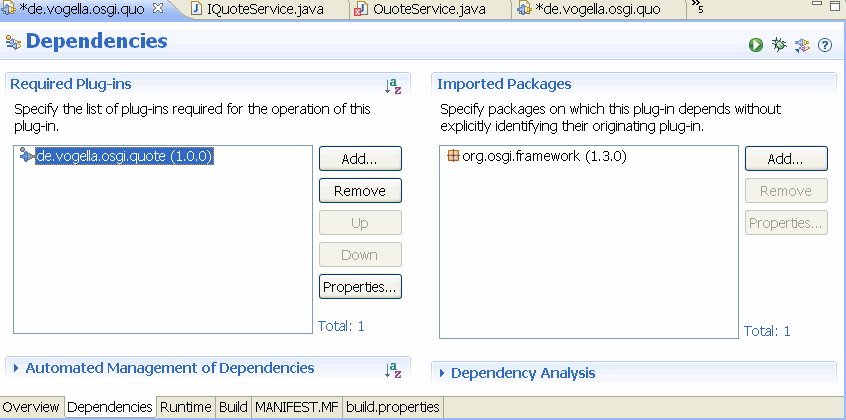
创建如下的一个”QuoteService”类:1
2
3
4
5
6
7
8
9
10
11
12
13
14
15
16
17
18
19
20
21
22
23
24package de.vogella.osgi.quoteservice.internal;
import java.util.Random;
import de.vogella.osgi.quote.IQuoteService;
public class QuoteService implements IQuoteService {
@Override
public String getQuote() {
Random random = new Random();
// create a number between 0 and 2
int nextInt = random.nextInt(3);
switch (nextInt) {
case 0:
return "Tell them I said something";
case 1:
return "I feel better already";
default:
return "Hubba Bubba, Baby!";
}
}
}
注册服务到它的Activator类:1
2
3
4
5
6
7
8
9
10
11
12
13
14
15
16
17
18
19
20
21
22
23
24package de.vogella.osgi.quoteservice;
import java.util.Hashtable;
import org.osgi.framework.BundleActivator;
import org.osgi.framework.BundleContext;
import de.vogella.osgi.quote.IQuoteService;
import de.vogella.osgi.quoteservice.internal.QuoteService;
public class Activator implements BundleActivator {
public void start(BundleContext context) throws Exception {
IQuoteService service = new QuoteService();
// Third parameter is a hashmap which allows to configure the service
// Not required in this example
context.registerService(IQuoteService.class.getName(), service,
null);
System.out.println("IQuoteService is registered");
}
public void stop(BundleContext context) throws Exception {
}
}
7.3. 安装服务
导出你的bundles,在你的服务器上面安装他们,并且启动的你的bundle。
什么都没有发生,因为我们还没有提供的消费者。
7.4. 使用你的服务
创建一个新的插件项目”de.vogella.osgi.quoteconsumer”,同样得将”de.vogella.osgi.quote”添加为依赖。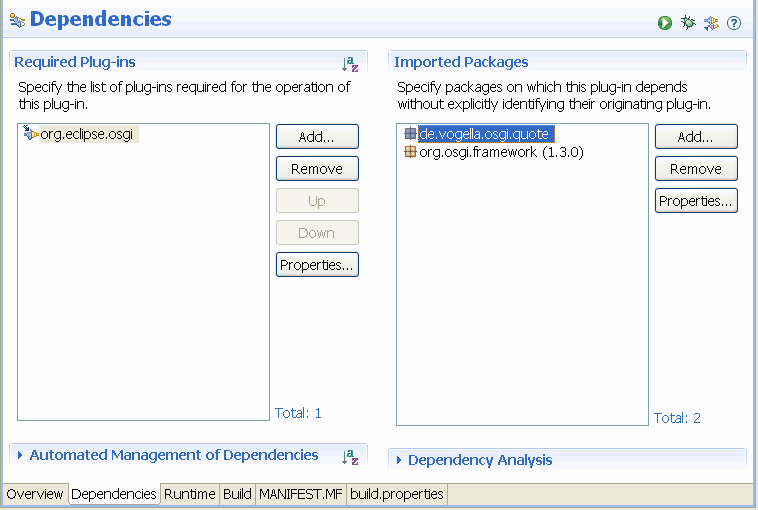
请注意,我们添加的是依赖包而不是依赖插件,这种方式可以让我使用不同的实现来替换服务。
让我们直接使用这个服务。1
2
3
4
5
6
7
8
9
10
11
12
13
14
15
16
17
18
19
20
21
22
23
24
25
26
27package de.vogella.osgi.quoteconsumer;
import org.osgi.framework.BundleActivator;
import org.osgi.framework.BundleContext;
import org.osgi.framework.ServiceReference;
import de.vogella.osgi.quote.IQuoteService;
public class Activator implements BundleActivator {
private BundleContext context;
private IQuoteService service;
public void start(BundleContext context) throws Exception {
this.context = context;
// Register directly with the service
ServiceReference reference = context
.getServiceReference(IQuoteService.class.getName());
service = (IQuoteService) context.getService(reference);
System.out.println(service.getQuote());
}
public void stop(BundleContext context) throws Exception {
System.out.println(service.getQuote());
}
}
导出这个bundle,安装它,然后启动它,最后停止它,一切工作正常。但是如果你停止bundle的服务你将会得到一个错误。
原因是OSGI是一个非常冬天的环境,服务可能在任何时刻都在注册和注销,下一章节将会使用服务追踪者来提升这个效果。
7.5. 在有服务追踪者时使用服务
在你的bundle中添加对”org.osgi.util.tracker”的依赖,使用下面的代码来定义MyQuoteServiceTrackerCustomizer:1
2
3
4
5
6
7
8
9
10
11
12
13
14
15
16
17
18
19
20
21
22
23
24
25
26
27
28
29
30
31
32
33
34
35
36
37
38
39
40
41
42
43
44
45
46
47
48
49
50
51
52
53
54
55
56
57
58
59
60
61
62
63
64
65
66package de.vogella.osgi.quoteconsumer;
import org.osgi.framework.BundleContext;
import org.osgi.framework.ServiceReference;
import org.osgi.util.tracker.ServiceTrackerCustomizer;
import de.vogella.osgi.quote.IQuoteService;
public class MyQuoteServiceTrackerCustomizer implements
ServiceTrackerCustomizer {
private final BundleContext context;
public MyQuoteServiceTrackerCustomizer(BundleContext context) {
this.context = context;
}
private MyThread thread;
@Override
public Object addingService(ServiceReference reference) {
IQuoteService service = (IQuoteService) context.getService(reference);
thread = new MyThread(service);
thread.start();
return service;
}
@Override
public void modifiedService(ServiceReference reference, Object service) {
// removedService(reference, service);
// addingService(reference);
}
@Override
public void removedService(ServiceReference reference, Object service) {
context.ungetService(reference);
System.out.println("How sad. Service for quote is gone");
thread.stopThread();
}
public static class MyThread extends Thread {
private volatile boolean active = true;
private final IQuoteService service;
public MyThread(IQuoteService service) {
this.service = service;
}
public void run() {
while (active) {
System.out.println(service.getQuote());
try {
Thread.sleep(5000);
} catch (Exception e) {
System.out.println("Thread interrupted " + e.getMessage());
}
}
}
public void stopThread() {
active = false;
}
}
}
你还需要在你的Activator中注册一个服务:1
2
3
4
5
6
7
8
9
10
11
12
13
14
15
16
17
18
19
20
21
22
23
24
25
26
27package de.vogella.osgi.quoteconsumer;
import org.osgi.framework.BundleActivator;
import org.osgi.framework.BundleContext;
import org.osgi.util.tracker.ServiceTracker;
import de.vogella.osgi.quote.IQuoteService;
public class Activator implements BundleActivator {
private ServiceTracker serviceTracker;
public void start(BundleContext context) throws Exception {
System.out.println("Starting quoteconsumer bundles");
// Register directly with the service
MyQuoteServiceTrackerCustomizer customer = new MyQuoteServiceTrackerCustomizer(context);
serviceTracker = new ServiceTracker(context, IQuoteService.class
.getName(), customer);
serviceTracker.open();
}
public void stop(BundleContext context) throws Exception {
System.out.println("Stopping quoteconsumer bundles");
serviceTracker.close();
}
}
再次导出你的bundle,启动OSGI控制台,使用更新命令或者安装命令得到你的新版本并且启动它,一旦你启动你的服务bundle,追踪者将会被调用,消费者bundle将会启动然后输出消息到控制台,停止服务之后可以验证消费者将不再使用服务。
8 Bndtools
Eclipse使用PDE工具来管理bundles,另外你可以使用托管在http://bndtools.org/上的Bndtools。
9 原文链接
参考的原文为OSGi Services - Tutorial
其实这里在原文中本来是版权协议的,我当然是没必要翻译了-_-!,
本作品采用[知识共享署名-非商业性使用-相同方式共享 2.5]中国大陆许可协议进行许可,我的博客欢迎复制共享,但在同时,希望保留我的署名权kubiCode,并且,不得用于商业用途。如您有任何疑问或者授权方面的协商,请给我留言。

