TeraSort在Hadoop中的非常非常非常简单的实现
关于TeraSort的思想其实是非常简单的,但是查了网上好多资料,感觉把它的实现复杂化了(指的在
Hadoop中),它们要自定义InputFormat,RecordReader等,其实我想说,实现一个TeraSort根本不需要这么麻烦,所以本文就将实现一个非常简单、非常简单、非常简单的实现记录下来,额,重要的事情说三遍。^_^
TeraSort简介
1TB排序通常用于衡量分布式数据处理框架的数据处理能力。TeraSort是Hadoop中的的一个排序作业,在2008年,Hadoop在1TB排序基准评估中赢得第一名,耗时209秒。(其实现在在TeraSort上Spark已将Hadoop甩在后面-_-)
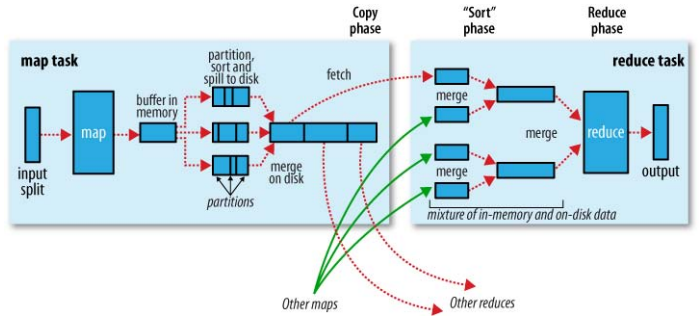
在看排序之前,先来看一下Map-Reduce的一张非常经典的流程图:
从图种可以了解到Map-Reduce执行的整个过程中会进行两次排序,一次是在Map端的shuffle,另一次是在Reduce端的shuffle,TeraSort正好是利用这种特性来进行排序
注意,这里的排序仅仅是针对
key的。
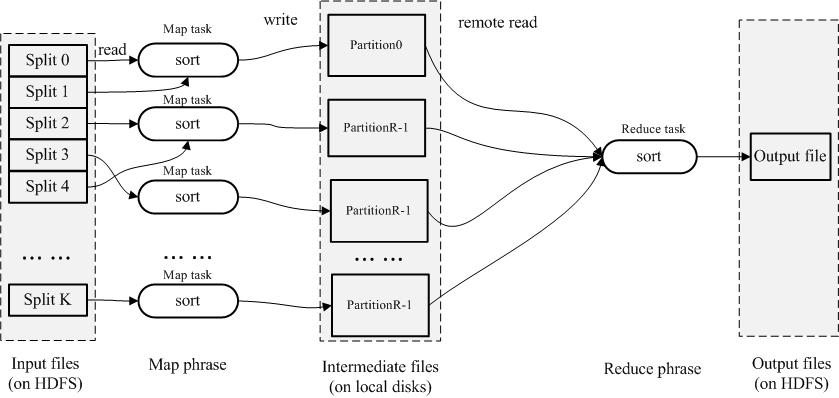
假如现在我只有一个reduce,那么根据上面描述的我们知道在这里reduce里面得到的值都是有序的,这是使用Hadoop最简单的排序方法,执行流程如下图:
这样的实现方式虽然便捷,但是丢失了排序在reduce端的并行度,那么有没有其他更好的方法呢?
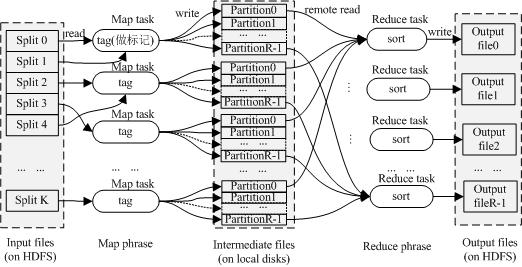
先来想象一下快速排序的思想,一个基准值的左侧都是小于该值,右侧都是大于基准值,也就是说左侧都是小于右侧的,那如果左侧都是有序的,并且右侧也是有序的,那就可以说整个序列是有序的,把这个思想放到Hadoop中去(一个reduce输出一个partition),我们已经知道二次排序之后得到的每个partition中的数据都是被排序过的,那假如对于两个任意的元素有partitoni<partitoni+1,那我们就可以说partiton(i,i+1)是有序的,把这个推广到全局的partition,就是TeraSort了

TeraSort实现
所以,把TeraSort方法用Hadoop来实现,必须要额外做的就是采样和数据划分。
- 采样:从输入数据中采取一定的样本比例,将这些样本进行排序,然后按reduce得数量进行夸区间取值,作为分区的划分标志
- 数据划分:在采样之后有的划分标志之后,根据划分标志对数据进行分区,确保partitoni<partitoni+1
例如:当前的输入数据为3,1,6,7,9,5,4,13,2,假设使用3个reduce
现采样的数据为3,1,6,7,9,5,则最终计算的划分标志就是3,7
也就是说小于等于3的落入第一个分区中,否则小于等于7的落入第二个分区中,其他的落入第三个放入中,则形成
{3,1,2},{6,7,5,4},{9,13},各个分区进行排序之后为{1,2,3},{4,5,6,7},{9,13},
就完成了最终的排序
好,现在来看这个很简单的程序代码:
首先,我们需要实现自己的采样:1
2
3
4
5
6
7
8
9
10
11
12
13
14
15
16
17
18
19
20
21
22
23
24
25
26
27
28
29
30
31
32
33
34
35
36
37
38
39
40
41
42
43
44
45
46
47
48
49
50
51
52
53
54
55
56
57
58
59
60
61
62
63
64
65
66
67
68
69
70
71
72
73
74
75
76
77
78
79
80
81
82
83
84
85
86
87
88
89
90
91
92
93
94
95
96
97
98
99
100
101
102
103
104
105
106
107
108
109
110
111
112
113
114/**
* 排序之前的采样器
* 先采样 再排序 再根据reducer数目取值
* @author root
*
*/
public class TearSortSampler {
/**
* 分片采样数据的路径
*/
public static final Path SPLIT_SAMPLE_PATH=new Path("/tmp/splitSample");
/**
* 进行采样 并且会将采样数据放入路径为SPLIT_SAMPLE_PATH的hdfs中
* @param job
* @param sampleNum
* @throws Exception
*/
public static void sampler(Job job,int sampleNum) throws Exception
{
InputFormat tif=new TextInputFormat();
List<InputSplit> inputSplits=tif.getSplits(job);
List<Integer> sampleList=new ArrayList<Integer>();
FileSystem fs=FileSystem.get(job.getConfiguration());
int recordsPerSample=sampleNum/inputSplits.size();//每个分片的采样数据
//按分片读取样本
for(InputSplit split:inputSplits)
{
int sn=0;
TaskAttemptContext context = new TaskAttemptContextImpl(
job.getConfiguration(), new TaskAttemptID());
RecordReader<Object,Text> reader=tif.createRecordReader(split, context);
Text text=new Text();
reader.initialize(split, context);
while(reader.nextKeyValue())
{
text=reader.getCurrentValue();
sampleList.add(Integer.parseInt(text.toString()));
if(sn++>recordsPerSample)
break;
}
reader.close();
}
Collections.sort(sampleList);//进行排序
//将采样数据写入hdfs
DataOutputStream writer = fs.create(SPLIT_SAMPLE_PATH,true);
int span=sampleList.size()/job.getNumReduceTasks(),n=0;
int x=job.getNumReduceTasks();
for(int i=span;i<sampleList.size();i+=span)
{
if(++n>=job.getNumReduceTasks())
break;
new Text(sampleList.get(i)+"\r\n").write(writer);
}
writer.close();
//添加缓存 不知道这里有用不 好像我没用到
job.addCacheFile(new URI(SPLIT_SAMPLE_PATH.toString()));
}
/**
* 获取分片标志点
* @param conf
* @param splitNum
* @return
* @throws NumberFormatException
* @throws IOException
*/
public static int[] getSplitPonit(Configuration conf,int splitNum)
{
FileSystem fs=null;
DataInputStream reader = null;
int[] points=new int[splitNum-1];
try
{
fs=FileSystem.get(conf);
reader = fs.open(SPLIT_SAMPLE_PATH);
for(int i=0;i<points.length;i++)
{
points[i]=Integer.parseInt(reader.readLine().trim());
}
}catch(Exception e)
{}
finally{
try{
if(reader!=null)
reader.close();//关闭异常可以不用理会
}catch(Exception e2){}
}
return points;
}
/**
* 删除采样路径
* @param job
* @throws IOException
*/
public static void deleteSamplePath(Job job) throws IOException
{
FileSystem fs=FileSystem.get(job.getConfiguration());
if(fs.exists(SPLIT_SAMPLE_PATH))
fs.delete(SPLIT_SAMPLE_PATH,true);
}
}
该采样其中主要包含采样以及划分标志的获取:
- 采样:从输入文件中读取各个分片,但是根据采样数量的区别,所以这里只会读取各个分片的top k个值,然后进行汇总排序,则进行跨区间取值,最后才放入自己的Hdfs中。
- 获取划分标志:从上一步存储的数据直接读取即可
再来卡一下简单的数据划分1
2
3
4
5
6
7
8
9
10
11
12
13
14
15
16
17
18
19
20
21
22
23
24
25
26
27
28
29
30
31
32
33
34
35
36
37
38
39
40
41
42
43
44
45
46
47
48
49
50public class TeraSortPartition
extends Partitioner<IntWritable,NullWritable>
implements Configurable{
private Configuration conf=null;
private int[] splitPoints=null;
/**
* 根据采样 的样本来划分
* @param key
* @param value
* @param splitNum
* @return
*/
@Override
public int getPartition(IntWritable key, NullWritable value, int splitNum) {
if(splitPoints==null)
splitPoints=TearSortSampler.getSplitPonit(conf,splitNum);
int index=-1;
for(int i=0;i<splitPoints.length;i++)
{
if(key.get()<=splitPoints[i])
{
index=i;
}
}
if(index==-1)
{
//key 很大 划分到最后一个分区
index=splitPoints.length;
}
return index;
}
public void initSplitPoints() throws Exception
{
}
@Override
public Configuration getConf() {
return this.conf;
}
@Override
public void setConf(Configuration conf) {
this.conf=conf;
}
}
此划分就是用到了采样器中的采样标志,然后该标志分别划分到相应的分区中
采样时发生在
JobClient端,获取划分标志是在Map端
最后就是实现MR步骤的代码了
1 | public static class TearSortMapper extends |
其实看了上面的程序还真的可以发现,TeraSort最核心的就是采样和划分,在具体的map和reduce只是一个输出而已
这里的测试输入是一行一个数字,现使用随机1w个数字来进行检测,设置了2个reduce,直接进行排序后的结果为:

从上面的结果中可以发现每个partition中都是排序的,而且两个partiton之间也是有序的,则完成了TeraSort
细心的同学可以看到10000个排序最后怎么只有6000来个数据输出了?额。。这是因为
shuffle过程中将其重复的key给合并了,所以最终输出量会减少,如果需要弯完整的得到10000个数据,得利用value,将key同步放入value中,然后在reduce阶段迭代输出value就好了,因为这个不是本文的重点,所以也没在意。。。 ^_^
总结
- 其实要完成TeraSort只需要添加采样和数据划分即可
- 这次采了不少坑,因为网上现有的好像TeraSort代码都是基于
Hadoop1.0的,也就是说用了mapred包里面的类,而Hadoop2.0中都是在mapreduce这个包下面,导致了很多API接口都不一样,最后看了Hadoop中的TeraSort样例才跌跌撞撞写完—_— - 然后这个程序并没有什么卵用,除了能让你更加方便的熟悉TeraSort的流程,如果这的要用TeraSort的话还是建议使用Hadoop样例中的版本,毕竟它考虑的更加全面^_^
配图来自网络,本作品采用[知识共享署名-非商业性使用-相同方式共享 2.5]中国大陆许可协议进行许可,我的博客欢迎复制共享,但在同时,希望保留我的署名权kubiCode,并且,不得用于商业用途。如您有任何疑问或者授权方面的协商,请给我留言。

